

Building My Brand One Pipeline at a Time #
I’ve read several books on professional advancement and one book that resonated with me was “The StartUp of You” by Reid Hoffman and Ben Casnocha. It really made me think about how I wanted to approach my career and how I could start building out my brand. Before I was in IT for the past twelve years, I was a chemist for ten years, and I thought I am overdue to share my knowledge and experiences with the outside world.
In the last year I’ve built my first real homelab. I not only wanted to create services for my household, but I wanted to learn technologies I wouldn’t get the chance to in my day job. I greatly believe in learning by doing, and building out a homelab to support my professional development and satisfy my strong curiosity was a perfect investment. In fact, my first ROV I presented to a major shareholder was deploying a Plex server (I love you, Ashley). When it came to a website, I wanted something simple, fast, and easy to maintain. I also wanted to make it as secure as possible, especially since it’s running on my home network.
I started searching for the perfect CMS. I looked at Ghost and even gave WordPress a little consideration. However, those two platforms were too bulky, and WordPress has a history of being a security nightmare if you are not careful. That is where I came across Hugo, a static site generator.
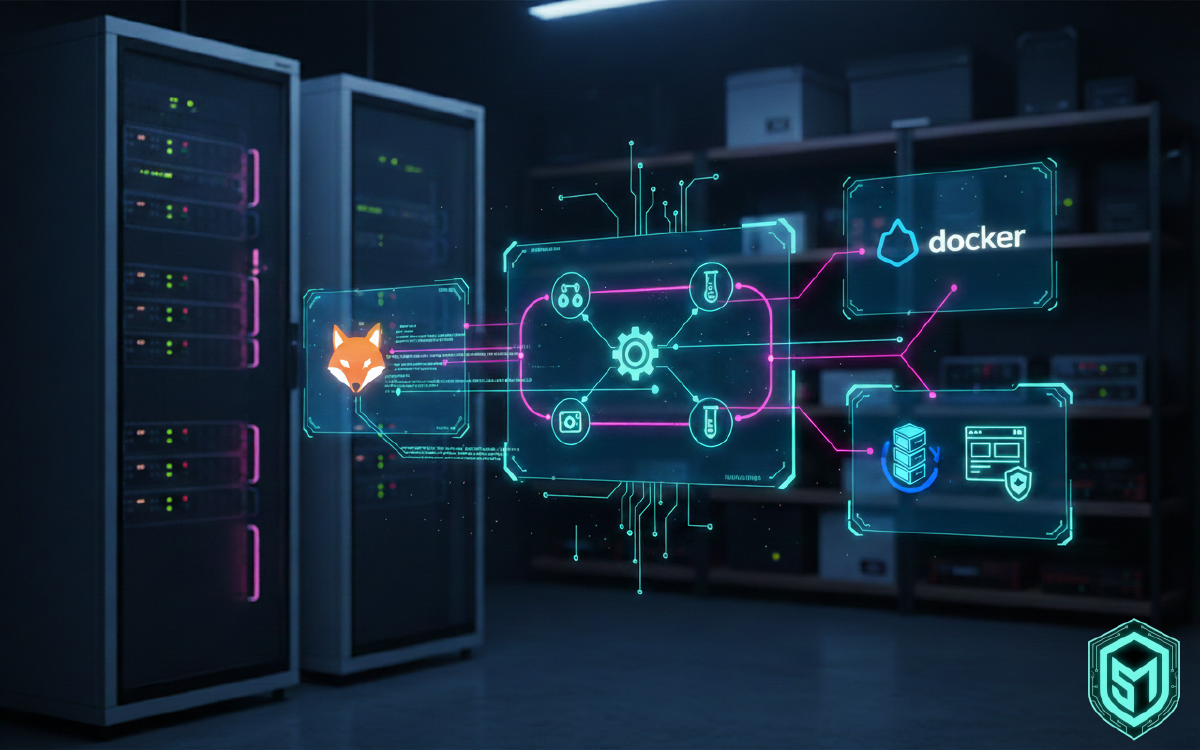
Another major requirement, the ability to deploy it myself, so I decided to use Docker to containerize it. I’ve been using GitLab for a while now and I’m a big fan of their CI/CD pipelines; it’s a great way to automate the build and deployment process. I’ve always loved the “website as code” concept, and this project was the perfect way to implement it. To pull it all together, I use an editor like VS Code/Antigravity to make my changes and then push them to GitLab. Then the build process and deployment is all handled by GitLab CI/CD. The container is pushed to an internal Docker registry, and then pulled by Portainer via webhook to be deployed.
50,000 Foot View - TL;DR #
This section is for those that don’t care about the nitty gritty details and just want that 50,000 foot view. Further below, I will go into greater detail about the choices I made and why I made them.
Enter the Pipeline #
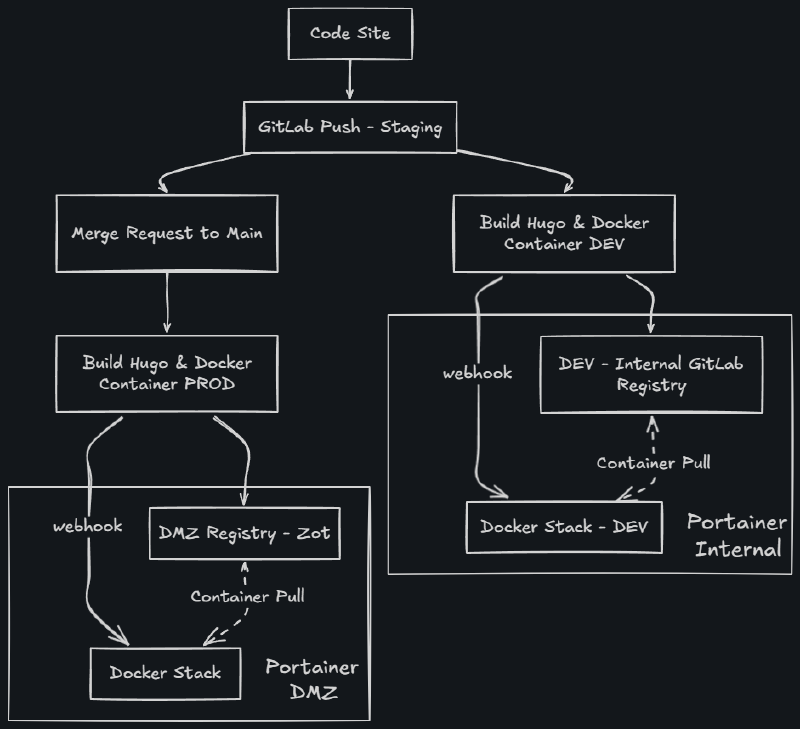
My workflow starts by pushing code to my internal GitLab. A CI/CD pipeline then builds the Hugo site, packages it in a Docker container, pushes it to a registry, and triggers a Portainer webhook for automated deployment.
I maintain two fully isolated pipelines to enforce zero-trust security:
- Development (Internal VLAN): Uses GitLab’s integrated registry for internal staging.
- Production (DMZ VLAN): Pushes to a self-hosted Zot registry in the DMZ.
This strict separation ensures the DMZ is completely segregated from my secure internal network. To further reduce the attack surface, all public-facing containers are locked down in a read-only state, unauthorized outbound traffic is blocked, and lateral VM-to-VM communication is restricted.
How You Got Here #
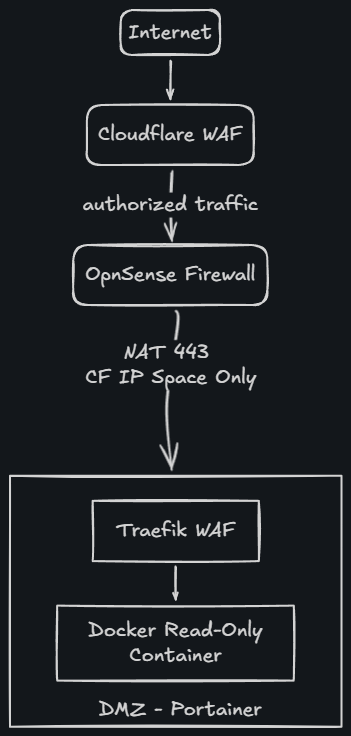
Regardless of how you found this site, your request first passed through Cloudflare’s WAF. To prevent circumvention, my perimeter firewall drops all traffic not explicitly originating from Cloudflare IP addresses. Valid traffic is then NAT’d over port 443 to Traefik (my internal reverse proxy), which handles SSL termination and routes the request to the lightweight Hugo container on port 80. The entire journey takes mere nanoseconds.
The Architectural Vision #
Sure, I wanted a simple website. But as a computer nerd and Senior Cybersecurity Architect, I couldn’t just “host” it. I had to architect it. That meant my personal brand needed an infrastructure mirroring the zero-trust enterprise environments I design professionally.
Engineering the Pipeline: Bridging the VLAN Gap #
The biggest architectural hurdle of this build? Getting code from my highly secure Internal Server VLAN out to the public-facing DMZ without punching reckless exceptions into my firewall.
In a traditional flat network, a CI/CD pipeline might just SSH into the web server and dump the code. But in a properly designed Zero-Trust architecture, the DMZ is treated as hostile territory. It simply cannot be allowed to initiate connections back into the internal network. To maintain that strict boundary, the deployment had to be a purely one-way “push” model originating from the secure zone.
Here is exactly how I automated that process using GitLab CI, Docker, and Portainer webhooks.
Software used in this project:
- Obsidian with Mermaid and Excalidraw plugins (Easier visualizations while generating content)
- Mermaid
- Excalidraw
- AntiGravity
- Git and Gitlab
- Hugo using the Blowfish theme
- Docker
- Portainer (Business Edition - this allows for the webhooks)
- Linux
- Traefik
- Zot
- NGINX
- LetsEncypt
- OPNsense
- Cloudflare
The Container Strategy #
Think Immutability—which actually served as the inspiration for the name of my site, Immutable Defense.
Before automating the deployment, I first needed a secure artifact to deploy. I opted to containerize the compiled Hugo site using a minimal Nginx image. The Dockerfile, located in the root directory of my Hugo site repository, exposes only port 80 since my internal WAF handles the SSL termination.
# Use Nginx to serve the content
FROM nginx:alpine

# Copy your website files to the Nginx html directory
# This assumes your site files are in the root or a 'dist' folder
COPY ./public   /usr/share/nginx/html

# Expose port 80
EXPOSE 80
CMD ["nginx", "-g", "daemon off;"]| Component | The “Architect” Reason |
|---|---|
| nginx:alpine Base | Alpine Linux dramatically reduces the attack surface by stripping out unnecessary OS packages. Smaller footprint = fewer CVEs. |
| Static Pre-Compilation | The container does not run Hugo. Hugo compiles the static HTML/CSS/JS during the CI pipeline, and only those flat files are injected into the container. There is no backend database or server-side rendering to exploit. |
| Read-Only Execution | While not defined in the Dockerfile itself, the resulting container is executed in a read-only state via the deployment stack. Even if an attacker compromised Nginx, they cannot alter the web pages or drop a web shell. |
The Deployment Architecture (Staging vs. Production) #
To ensure I never break the live site, I built a two-tiered pipeline.
-
Staging: Code pushed to the staging branch builds a “draft-enabled” version of the site and deploys it entirely within my internal VLAN. From here, I can visit the site internally via dev.<internal-domain.com> (reachable only internally) for inspection before deployment.
-
Production: Code merged to main builds the final site, pushes the image across the VLAN boundary into the DMZ’s Zot registry, and triggers the DMZ Portainer to redeploy the container, thus updating the live site.
The GitLab CI/CD Pipeline #
I followed GitLab’s official documentation to install and deploy a runner in my internal GitLab deployment. Here is my .gitlab-ci.yml that orchestrates this workflow. It defines the strict separation of duties between the Staging and Production environments. I keep my API keys hidden in the CI/CD variable storage, so it’s effectively acting as a secrets manager. This file is in the parent directory of my Hugo site git repo.
stages:
  - build
  - deploy

variables:
  CI_REGISTRY: <internal-gitlab.domain.com>:5050  # We'll override these in the jobs
  IMAGE_NAME: $CI_REGISTRY/<username>/<sitename>.com
  TOKEN: $gitlab_runner_key
  CI_REGISTRY_USER: <username>
  ZOT_USERNAME: $zot_username
  ZOT_PASSWORD: $zot_password

  # Portainer Webhook URLs
  PROD_PORTAINER_WEBHOOK_URL: <redacted>
  STAGING_PORTAINER_WEBHOOK_URL: <redacted>

# --- STAGING BUILD ---
build_staging:
  stage: build
  script:
    - hugo -D # Show drafts on DEV
    - echo "$TOKEN" | docker login -u "$CI_REGISTRY_USER" --password-stdin $CI_REGISTRY
    - docker build -t $IMAGE_NAME:staging .
    - docker push $IMAGE_NAME:staging
  only:
    - staging
  tags:
    - docker

# --- PROD BUILD ---
build_prod:
  stage: build
  script:
    - hugo
    - echo "$TOKEN" | docker login -u "$CI_REGISTRY_USER" --password-stdin $CI_REGISTRY

    # Push to internal
    - docker build -t $IMAGE_NAME:latest .
    - docker push $IMAGE_NAME:latest

    # Push to DMZ Zot Mirror
    - echo "$ZOT_PASSWORD" | docker login -u "$ZOT_USERNAME" --password-stdin <registry.dmz-domain.com>
    - docker tag $IMAGE_NAME:latest <registry.dmz-domain.com>/<username>/site:latest
    - docker push <registry.dmz-domain.com>/<username>/site:latest
  only:
    - main
  tags:
    - docker

# --- STAGING DEPLOY ---
deploy_staging:
  stage: deploy
  script:
    - curl -X POST "$STAGING_PORTAINER_WEBHOOK_URL"
  only:
    - staging
  tags:
    - docker

# --- PROD DEPLOY ---
deploy_prod:
  stage: deploy
  script:
    - curl -k -X POST "$PROD_PORTAINER_WEBHOOK_URL"
  only:
    - main
  tags:
- docker| Section | Architectural Significance |
|---|---|
| hugo -D vs hugo | “The staging job compiles Hugo with the -D flag to render draft posts, allowing me to review content locally before it goes live. The prod job drops this flag, ensuring only published content makes it to the DMZ.” |
| Split-Horizon Push | “In build_prod, the runner pushes to <registry.dmz-domain.com>. Because of my internal Pi-hole DNS, this traffic routes directly to the DMZ VLAN’s internal IP (bypassing Cloudflare), allowing for massive, high-speed image transfers without hitting the WAN.” |
| Webhook Decoupling | “Instead of giving GitLab SSH access to the Docker hosts, I use Portainer’s webhook feature. GitLab simply sends an authenticated POST request. Portainer receives the signal, reaches out to the registry, pulls the new image, and gracefully recycles the container.” |
Securing the Management Plane & Webhooks #
A sharp eye might notice the use of curl -k (which bypasses SSL certificate validation) on the Production deploy job, but not the Staging job. This is an intentional design choice reflecting the different trust zones.
-
Internal Staging (<portainer.internal-domain.com>): My internal network utilizes an NGINX reverse proxy that handles Let’s Encrypt certificates via DNS-01 challenges. Because this is fully trusted and validated internally, the GitLab runner can make a standard, secure HTTPS POST request to the webhook.
-
DMZ Production (<portainer-dmz.internal-domain.com>:9443): To keep management interfaces completely dark, I do not expose the DMZ Portainer instance in any public DNS records—that is an absolute non-negotiable for security. Because it is accessed directly via its IP/internal hostname on port 9443 without a public-facing proxy, it uses a self-signed certificate. The -k flag allows the internal GitLab runner to trigger the webhook across the VLAN boundary without failing the pipeline on a self-signed cert error.
The Production Stacks: Decoupling the Architecture #
A common anti-pattern in home labs is throwing every service into a single, monolithic docker-compose.yml file. If you need to update a website label, you shouldn’t risk tearing down your ingress controller or container registry.
To maintain stability and enforce strict security boundaries, I decoupled the DMZ environment into two distinct Portainer stacks: the Gateway/Registry Stack and the Production Application Stack. In my internal Portainer instance, I used NGINX that runs alongside Portainer, so the Traefik/Zot registry is not needed. Also, for my internal network, I make use of the registry in GitLab.
Stack 1: The Gateway and Registry (Traefik & Zot) #
This stack forms the network backbone hosted site in my DMZ. It establishes the internal proxy network, handles all SSL certificate generation via the DNS-01 challenge, and hosts the private secured Zot registry that stores the docker container. One of the risks I accepted was storing my API locally in a locked down file. In the future, I may consider a secrets manager.
version: '3.8'

services:
  traefik:
    image: traefik:latest
    container_name: dmz-traefik
    read_only: true
    restart: always
    command:
      - "--api.dashboard=true"
      - "--providers.docker=true"
      - "--providers.docker.exposedbydefault=false"
      - "--entrypoints.websecure.address=:443"
      # Cloudflare DNS Challenge
      - "--certificatesresolvers.cloudflare.acme.dnschallenge=true"
      - "--certificatesresolvers.cloudflare.acme.dnschallenge.provider=cloudflare"
      - "--certificatesresolvers.cloudflare.acme.email=<redacted>"
      - "--certificatesresolvers.cloudflare.acme.storage=/letsencrypt/acme.json"
      - "--accesslog=true"
      - "--accesslog.filepath=/var/log/traefik/access.log"
    environment:
      # The _FILE suffix tells Traefik to read the content of this path
      - CF_DNS_API_TOKEN_FILE=<redacted>
    secrets:
      - cf_token
    ports:
      - "443:443"
    volumes:
      - /var/run/docker.sock:/var/run/docker.sock:ro
      - ./letsencrypt:/letsencrypt
      - /var/log/traefik:/var/log/traefik
    tmpfs:
      - /tmp:size=1M
      - /var/run:size=1M
    networks:
      - proxy_net

  zot:
    image: ghcr.io/project-zot/zot-linux-amd64:latest
    container_name: dmz-registry
    restart: always
    volumes:
      # CONFIG: Read-Only (Safety first!)
      - /opt/zot/zot-config.json:/etc/zot/config.json:ro
      # DATA: Read/Write (Required for pushes)
      - /opt/zot/data:/var/lib/zot:rw
      # Password file
      - /opt/zot/htpasswd:/etc/zot/htpasswd:ro
      # Zot Logs
      - /var/log/zot:/var/log/zot:rw
    labels:
      - "traefik.enable=true"
      - "traefik.http.routers.zot.rule=Host(`<registry.dmz-domain.com>`)"
      - "traefik.http.routers.zot.entrypoints=websecure"
      - "traefik.http.routers.zot.tls.certresolver=cloudflare"
      - "traefik.http.services.zot.loadbalancer.server.port=5000"
    networks:
      - proxy_net

# --- THE ARCHITECT'S SECRET ---
secrets:
  cf_token:
    file: /home/<user>/cf_token.txt

networks:
  proxy_net:
    name: proxy_net
    driver: bridge
Architectural Decisions in Stack 1:
| Configuration | The “Architect” Reason |
|---|---|
| Docker Secrets | Hardcoding API tokens in environment variables is a critical flaw, as they can be exposed via docker inspect. Using Docker Secrets mounts the CF_DNS_API_TOKEN_FILE securely into the container’s memory. |
| read_only: true & tmpfs | Traefik is forced into a read-only state. By using tmpfs, I allocate 1MB of ephemeral RAM for /tmp and /var/run, allowing the proxy to function without ever touching the underlying disk. |
| Granular Volume Permissions | The Zot registry requires write access to store the pushed images (:rw), but the configuration and authentication files are strictly mounted as read-only (:ro) to prevent tampering. Zot is also password protected and the credentials are stored in my GitLab secrets manager. This is to prevent possible tampering, and uploading and deploying a tampered Docker container. |
Stack 2: The Production Website #
With the ingress and registry established, the actual website stack becomes incredibly lightweight. This is the stack that gets triggered and recreated by the Portainer webhook from GitLab.
version: '3.8'

services:
  my-website:
    image: [<registry.dmz-domain.com>/<username>/site:latest](https://<registry.dmz-domain.com>/<username>/site:latest)
    container_name: <website_container>
    restart: always
    pull_policy: always

    # 1. Lock the filesystem
    read_only: true

    # 2. Map logs to your host machine
    volumes:
      - /var/log/<website_name>:/var/log/nginx

    # 3. Give Nginx temporary memory space for internal operations
    tmpfs:
      - /var/cache/nginx:size=10M
      - /var/run:size=1M
      - /tmp:size=1M

    # 4. Traefik Routing Labels
    labels:
      - "traefik.enable=true"
      # This identifies which domain points to this container
      - "traefik.http.routers.hugo.rule=Host(`<public-domain.com>`) || Host(`www.<public-domain.com>`)"
      - "traefik.http.routers.hugo.entrypoints=websecure"
      # Tells Traefik to use the Cloudflare/Let's Encrypt resolver
      - "traefik.http.routers.hugo.tls.certresolver=cloudflare"
      # Tells Traefik to route traffic to Nginx's internal port 80
      - "traefik.http.services.hugo.loadbalancer.server.port=80"
    networks:
      - proxy_net

networks:
  proxy_net:
    external: true  # This tells Portainer "Don't create it, it's already there"
Architectural Decisions in Stack 2:
| Configuration | The “Architect” Reason |
|---|---|
| pull_policy: always | Crucial for the CI/CD pipeline. When the webhook triggers an update, this forces Docker to pull the fresh image from the Zot registry rather than relying on a locally cached :latest tag. |
| Nginx tmpfs Mounts | Nginx requires write access to function (for PID files and caches). Since the container is locked to read_only: true, mounting /var/cache/nginx, /var/run, and /tmp to tmpfs creates a secure, ephemeral memory space that vanishes when the container restarts. |
| external: true Network | This container exposes zero ports to the host (no ports: directive). It simply attaches to the pre-existing proxy_net. All traffic must flow through Traefik, ensuring the website is never exposed directly to the network interface. |
| Host Log Mapping | By mapping /var/log/nginx directly to the host’s /var/log/<website_name> directory, I ensure that all access logs survive container destruction and are instantly available for ingestion into my SIEM. |
By enforcing read_only: true and no-new-privileges:true, the container’s root filesystem is locked down, and processes cannot gain additional privileges. The container does not expose ports directly to the Docker host; it only communicates on the isolated proxy network, forcing all inbound traffic to pass through Traefik’s inspection.
OPNSense & Firewalls #
To prevent anyone from bypassing the Web Application Firewall (WAF), OPNsense is configured to only allow incoming traffic from authenticated Cloudflare IP addresses. Additionally, outbound egress traffic from the DMZ is strictly blocked. The web hosting VM is only permitted to initiate outbound connections to specific IPs required for system updates. Since legitimate web traffic over port 443 originates externally, any attempt to initiate an outbound connection on this port from the VM itself is inherently blocked. This strict egress filtering significantly mitigates the risk of an attacker establishing a reverse shell or Command and Control (C2) connection. Furthermore, OPNsense completely isolates the DMZ from the internal VLANs. At the hypervisor level, firewall rules within Proxmox prevent VMs in the DMZ from communicating with one another, neutralizing the risk of lateral movement.
Beyond access control, OPNsense handles Network Address Translation (NAT) and manages Dynamic DNS, keeping Cloudflare updated with my home network’s dynamic public IP address. It also serves as the routing core for my entire VLAN architecture, working in tandem with my Ubiquiti switch to enforce port-level isolation and ensure no unintended traffic crossover occurs between network segments.
A Note on Observability #
I couldn’t build this without visibility. Traefik is configured to extract and trust the CF-Connecting-IP headers so the true visitor IPs are logged and shipped directly to my internal Splunk instance, rather than showing Cloudflare’s proxy IPs.
However, diving into the SOC side of this architecture—including how I integrate Splunk, Wazuh, Zeek, and Suricata—is a massive topic on its own. That will be the focus of my upcoming Threat Hunting Lab project, so stay tuned.
Final Thoughts #
Building this site was about more than just hosting a blog. It was a deliberate exercise in translating enterprise security principles into a tangible, functioning pipeline. By moving security to the edge and the perimeter, maintaining strict VLAN isolation, and ensuring every action is automated and observable, I’ve created a stack that is resilient, performant, and truly “production-ready.”
For the architecture diagrams, I initially outline them in Mermaid before translating them into Excalidraw PNGs. I prefer Excalidraw’s hand-drawn aesthetic, and retaining the source files makes any future edits trivial. I plan to automate this conversion process eventually to streamline my publishing workflow even further. To round out my content generation pipeline, I leverage Gemini to serve as my personal editor and creative department for generating high-quality images.
If you’re into architecture deep-dives or homelab builds, I look forward to sharing more of this journey with you. You may have noticed I have also redacted internal DNS names and IP addresses throughout this post. If you feel I missed something, or want to chat about the process please feel free to reach out to me.